Curb Check
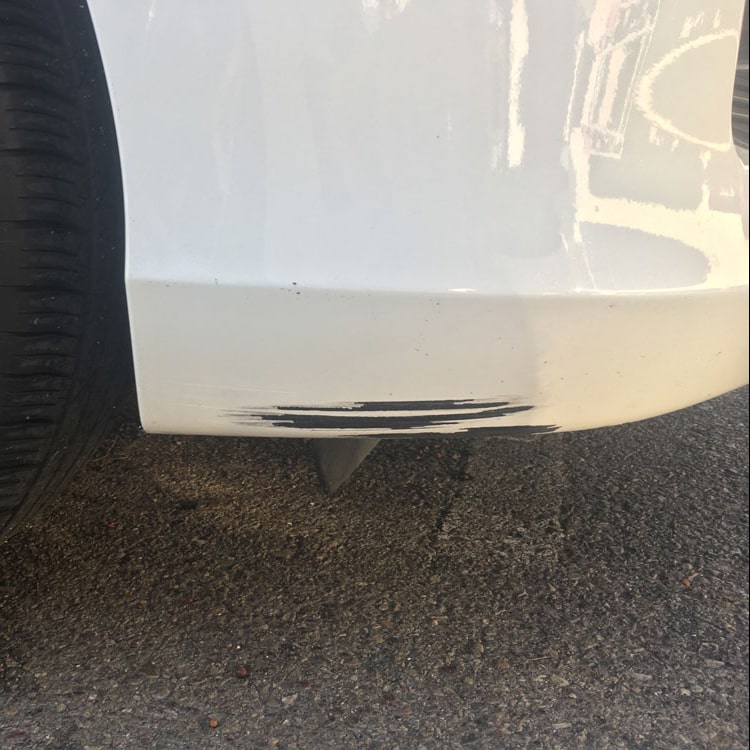
Bumper scrapes are the most common paint damage I see, mostly from drivers hitting high curbs. With a push over the years for MPG, manufacturers have been lowering front bumpers closer and closer to the ground.
Unfortunately, it takes very little to damage your car’s paint. You are, in essence, driving your car into sand paper when you bump a curb. You’ll be happy to know that your bumper is made of plastic, so it’s not going to rust. The main reasons you’d want to repair a bumper scrape are if you can’t stand the way it looks, you want to stop the paint from peeling, or you’ve got to make it disappear before mom gets home. When the inevitable kissing-of-the-curb occurs, you’ve got a few options for bumper scrape repair depending on the location and intensity of the “kiss”.
Bumper Scrape Repair Options
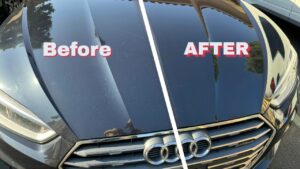
As is the case with most car paint damage, you’ll need to decide if you want it to look brand new or if you’re okay with just covering it up so it doesn’t catch your eye.
Body Shop: For near-perfect results, you’ll want a body shop. They will take the bumper off, sand it down, and then spray it in a clean room. The cost could be anywhere from $250 to $600, depending on where you go. They’ll need your car for a few days.
Mobile Bumper Spray: A mobile bumper technician can do a really good job for about $250. It’ll take them an hour or so, and they’ll come to you. They’ll do a lite version of the body shop repair, leaving the bumper on your car.
Mobile Touch-Up: The least expensive option is touch-up. Since it won’t rust, and likely won’t lead to further damage, the average driver prefers to spend less in this situation. If the damage is closer to the ground, its pretty easy to hide with touch-up paint. The higher up it is, the harder it becomes to hide. A darker paint color also makes it easier to cover up. You can hire a professional touch-up company, like us, who will come to you, or you can try it yourself!
DIY Bumper Scrape Repair
Before you get started, I have two important tips for you.
The first thing to consider is that what you’re assuming is damage could actually be transfer from the thing you hit. Sometimes, what you’ve hit has simply rubbed off onto your car. There might not be as much damage as you think. Some rubbing compound will take it off if that’s the case. Please, DO NOT USE A SCOTCH BRITE PAD FROM THE KITCHEN. Use a clean microfiber cloth to gently rub it off.
The second is to not use sandpaper to smooth out the bumper scrape before painting. Sanding it will make it much harder to get the paint to sit in the scrape, and you’re very likely to damage the surrounding good paint.
(Click here to read our post on some general car paint dos and don’ts.)
Supplies
Here’s what you’ll need:
Touch-up paint: The first thing you’ll need is touch-up paint that matches your vehicle. Click here if you’re not sure how to find your car’s paint code. I highly recommend using the Dr. Colorchip paint system. Their basic kit will have almost everything you need.
Paint brush: Get a 1/4″ brush from a craft store. Don’t use the brush that comes with the kit (at least not for a bumper scrape).
Paper cup: Or something relatively small to put the paint in. I use the little white paper cups they give you for ketchup at fast food restaurants. You can get them at a craft store or on Amazon.
Acetone: You can get this from any hardware store. You’ll use a few drops of this to thin the paint as you work.
Blending solution: This will come with your Dr. Colorchip kit. You can use it to smooth out your paint job, or to remove paint if you mess up.
The Method
Pour some paint in your paper cup, and then thin it out by mixing in a drop or two of acetone.
When you first apply the paint, you just want to put a wash of color over the scrape. Try to keep all strokes going in the same direction, with the ‘grain’ of the scrape.
Wait until the first layer dries, then add another layer of paint. Each time you apply, put the paint on a little thicker. If you use too much acetone on the secondary coats, the acetone will wipe away your first coat. Keep going until the bumper no longer shows and the scrape is pretty well blended into the surrounding paint.
Don’t forget to take a step back after a little bit. It may not look amazing after staring at it for so long up close, but it should look way better from a short distance!
When you’re done applying paint, you can use the blending solution to taper your touch-up paint into the “good” paint around the edges of the damaged area. Use a clean, soft cloth for this. It will completely remove the touch-up paint so be careful not remove paint from the damaged area so you don’t have to do it again.
That’s it! You’ve repaired your bumper scrape. If you use this post, we’d love to see your before and after photos!